 Reviews

 Proudly American

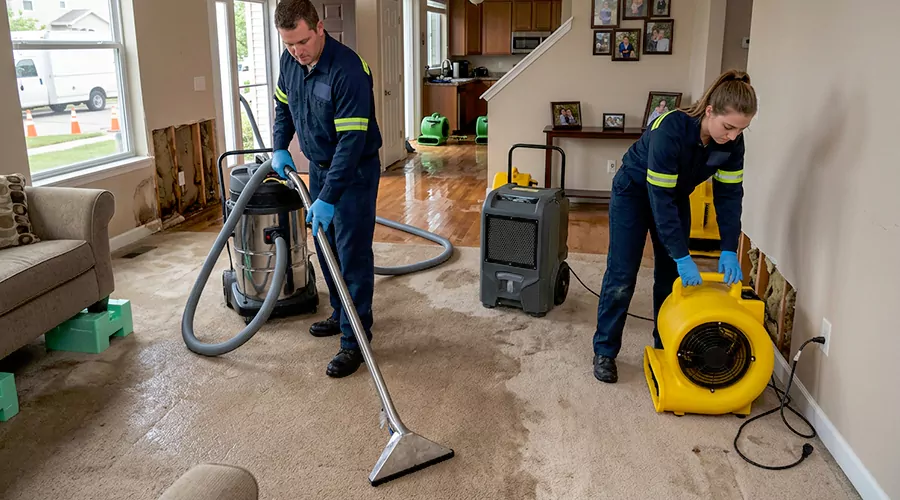
Water damage clean up should begin as soon as the source is stopped because wet materials can develop mold within 24 to 48 hours. In 2026, a small Class 1 water loss may cost about $150 to $500 to restore. Larger residential projects commonly reach $2,000 to $6,000.
The cleanup order matters. Standing water should be removed before drying begins. Damaged materials should then be checked for hidden moisture before cleaning or repairs start.
Not every water loss is safe for DIY cleanup. Water from sewage or outdoor flooding requires a different response than a small leak from a clean plumbing line.
What Should You Do First After Water Damage?
The first priority is stopping additional water and making sure the affected area is safe to enter. Electrical hazards must be considered before cleanup starts. You should also document visible damage before moving wet materials because those photos can help establish what happened before the room changes.
Take these steps first:
- Find the source of the water.
- Shut off the leaking fixture or main water supply when safe.
- Stay out of standing water near electrical equipment.
- Photograph the affected rooms and belongings.
- Move dry belongings away from spreading moisture.
- Determine whether the water may contain contamination.
Never step into standing water to reach an electrical panel. Power should only be handled when the panel can be reached safely from a dry location.
Emergency water damage becomes more serious when ceilings begin sagging or electrical equipment becomes wet. The same applies when the water source cannot be controlled.
How to Clean Up Water Damage Step by Step
A proper cleanup follows a clear order. Stop the source first and remove standing water next. Expose wet materials so air can reach them. Dry the structure completely before cleaning salvageable surfaces or beginning repairs. Skipping one stage can leave moisture trapped below the visible surface.
Step 1: Stop the Water Source
Cleanup cannot succeed while new water is still entering the property. Turn off the affected plumbing connection when the cause is obvious and accessible.
Common sources include:
- Broken supply lines
- Leaking water heaters
- Washing machine hoses
- Dishwasher leaks
- Roof leaks
- Overflowing plumbing fixtures
- Groundwater entering a basement
A slow leak deserves the same attention as a sudden burst pipe. Water can move behind cabinets or walls before a large puddle develops.
Water leak restoration becomes more complicated when the source remains active for several days. Hidden moisture can spread much farther than the original visible stain.
Step 2: Document the Damage Before Moving Things
Take clear photographs before extracting water when conditions are safe. Photograph the water source and the affected materials. Record damaged belongings before discarding anything.
Useful documentation includes:
- Wide photos of each affected room
- Close photos of visible damage
- Images of the suspected source
- Photos of damaged flooring
- Images of wet furniture or belongings
- Notes showing when the water was discovered
Documentation also creates a useful record for later repairs. It can show where flooring or drywall originally became wet even after the area begins drying.
Step 3: Remove Standing Water
Standing water should be removed as quickly as conditions allow. A mop or towels may be enough for a very small clean-water spill. A wet and dry vacuum can remove larger amounts when electricity has been confirmed safe for use in the area.
Water removal services use pumps and extraction equipment when the amount exceeds normal household cleanup capacity. Large volumes also take longer to remove with small equipment.
For minor clean-water losses:
- Start with visible puddles.
- Extract water from hard flooring.
- Check beneath movable rugs.
- Remove water around furniture legs.
- Inspect room edges for trapped moisture.
Do not use a standard household vacuum to remove water. Only equipment designed for wet extraction should be used.
Step 4: Move Wet Items Out of the Affected Area
Wet belongings can slow structural drying because they continue releasing moisture into the room. Move removable items to a suitable drying area when they can be handled safely.
Separate items into simple groups:
- Items that appear dry
- Items that can be cleaned and dried
- Materials that may need disposal
- Valuable items that need special handling
Furniture should not be placed directly onto another finished floor while the legs remain wet. Moisture can transfer and create a second damaged area.
Carpet water damage also deserves close attention at this stage. The carpet surface can look manageable while the padding underneath remains saturated.
Step 5: Check Beneath Carpet and Flooring
Floor coverings can hide a large amount of moisture. Water can move through carpet padding or flooring seams before the upper surface shows serious damage. The subfloor should therefore be considered whenever water has remained on the floor for more than a short spill.
Check for:
- Damp carpet padding
- Raised laminate seams
- Cupped hardwood boards
- Soft areas in the subfloor
- Moisture along baseboards
- Darkened wood near room edges
Wet carpet drying must address the material underneath the visible fibers. Drying only the carpet surface can leave the padding wet.
Water damage carpet cleaning is most appropriate after clean-water exposure when the carpet can be dried promptly. Contaminated water changes what can safely be saved.
Step 6: Begin Drying the Room
Drying should begin after standing water has been removed. Open interior doors to improve airflow when conditions allow. Dehumidifiers can reduce moisture in the surrounding air while fans help wet surfaces release moisture faster.
The EPA recommends drying water-damaged materials within 24 to 48 hours when possible. Indoor humidity should stay below 60 percent and preferably between 30 and 50 percent.
A practical drying setup can include:
- Dehumidifiers sized for the affected space
- Fans directed across wet surfaces
- Open cabinet doors
- Removed wet rugs
- Increased ventilation when outdoor conditions allow
- Clear airflow around damp walls
Do not assume one day of fan use means the structure is dry. Dense materials can hold moisture after the room feels comfortable again.
Structural drying should continue until affected materials have returned close to normal moisture conditions. The calendar alone cannot confirm that point.
Step 7: Remove Materials That Cannot Be Dried
Some porous materials lose strength or hold contamination after prolonged saturation. Removing these materials can expose hidden moisture and allow the remaining structure to dry more effectively.
Replacement is more likely for:
- Saturated cellulose insulation
- Severely swollen particleboard
- Heavily damaged drywall
- Contaminated carpet padding
- Waterlogged ceiling tiles
- Materials affected by sewage
Hard surfaces are often easier to clean because water does not penetrate them as deeply. Porous materials require more careful decisions.
Water damage mitigation focuses on preventing the existing loss from becoming worse. Selective removal can be part of that process when damaged material traps moisture.
Step 8: Clean the Affected Surfaces
Cleaning begins after loose debris has been removed and the area is under control. Hard surfaces exposed to clean water can usually be washed with water and detergent before being dried completely.
Avoid aggressive scrubbing when flood contamination or visible mold is present. Disturbing dried residue can send particles into the air.
For ordinary clean-water cleanup:
- Remove loose dirt with a damp method.
- Wash suitable hard surfaces with detergent.
- Rinse when the product instructions require it.
- Dry cleaned surfaces promptly.
- Keep wet cleaning tools away from dry rooms.
Never mix household cleaning chemicals together. Bleach should never be mixed with ammonia because the combination can produce dangerous gases.
Water remediation involves more than making a surface look clean. The moisture condition must also be corrected.
Step 9: Check for Hidden Moisture
A dry-looking wall or floor can still contain moisture below the surface. This is one of the most common reasons a cleanup appears finished before the building is actually dry.
Check these areas carefully:
- Behind baseboards
- Beneath carpet padding
- Around door trim
- Below cabinets
- Along drywall near the floor
- Under accessible flooring edges
- Around plumbing penetrations
- Beneath affected furniture
A moisture meter can make this check more useful. Compare the reading with the same type of material in an unaffected area of the home.
Water damage drying should be based on material condition rather than touch alone. A wall can feel dry while the backside of the drywall remains damp.
What Should Be Saved and What Should Be Discarded?
The decision depends on the material and the source of the water. Nonporous surfaces are generally easier to clean. Porous materials can trap moisture or contamination deeper inside. Items exposed to sewage or outdoor floodwater require much more cautious handling than items exposed to a clean supply-line leak.
Use this general comparison:
| Material | Often Can Be Saved | Replacement Is More Likely When |
|---|---|---|
| Ceramic tile | Surface remains intact | Subfloor is badly damaged |
| Solid wood | Dried promptly after clean water | Warped or deteriorated |
| Drywall | Limited clean-water exposure | Soft or heavily saturated |
| Carpet | Clean water with fast extraction | Sewage exposure or prolonged saturation |
| Carpet padding | Very limited clean-water exposure | Heavily saturated |
| Particleboard | Minor surface exposure | Swollen or crumbling |
| Insulation | Depends on material and exposure | Contaminated or waterlogged |
| Upholstered furniture | Limited clean-water exposure | Deep contamination or persistent moisture |
Water damage repair should not begin until the affected area has dried. Installing new materials too early can seal moisture inside the structure.
Restoration after water damage may involve replacing drywall or flooring after drying is complete. Cleanup and reconstruction are separate stages.
How Do You Know When the Area Is Actually Dry?
An affected area is dry when the materials have returned close to their normal moisture condition rather than simply feeling dry at the surface. Compare suspect materials with similar unaffected materials. Indoor humidity should also return to a normal range without constantly rising after drying equipment is reduced.
A basic home check includes:
- Inspect the surface for dark or swollen areas.
- Compare it with an unaffected section.
- Use a moisture meter when available.
- Check the room humidity with a hygrometer.
- Inspect the area again after drying equipment is reduced.
Pay particular attention to baseboards and subfloors. These areas can remain damp after the center of a room has dried.
A musty smell is another warning sign. Odor alone cannot measure moisture but it can indicate that the cleanup deserves another inspection.
The useful rule is simple. Dry appearance is not the same as confirmed dryness.
How Much Does Water Damage Cleanup Cost in 2026?
Water damage cleanup cost depends on contamination and the amount of the building that became wet. In 2026, average restoration projects run about $2,000 to $6,000 nationally. Very limited Class 1 losses can cost around $150 to $500 while extensive damage can reach $15,000 or more.
Water extraction and drying commonly cost about $4 to $12 per square foot based on water category.
| Type of Water | Typical 2026 Extraction and Drying Cost |
|---|---|
| Clean water | $4 to $6 per sq. ft. |
| Gray water | $6 to $9 per sq. ft. |
| Black water | $9 to $12 per sq. ft. |
The total increases when flooring or drywall needs replacement. Mold treatment can also add another repair stage if wet materials were not dried quickly.
Water damage restoration cost should therefore be viewed as more than the price of removing a puddle. Extraction is only one part of the work when moisture has entered the building.
When Should You Call a Professional?
Professional help becomes appropriate when the water is contaminated or the affected area is too large to dry with household equipment. Electrical exposure is another clear trigger. Hidden moisture inside walls can also make DIY cleanup unreliable because the visible room no longer shows the complete extent of the damage.
Professional assessment is appropriate when:
- Sewage entered the property.
- Outdoor floodwater entered the home.
- Water reached electrical equipment.
- Several rooms are affected.
- A ceiling is sagging.
- Water entered wall cavities.
- Insulation is saturated.
- Hardwood flooring is badly buckled.
- Mold is already visible across a large area.
- Materials remain wet after active drying.
- The source of the leak cannot be identified.
- The structure appears unstable.
Water mitigation services can use extraction equipment and commercial drying systems when the loss exceeds household cleanup capacity. Moisture mapping can also locate wet materials that aren't obvious from the surface.
Water remediation services become especially relevant when contamination is present. Sewage and outside floodwater can contain harmful organisms or chemicals.
Residential water damage restoration may also include later reconstruction once the affected building materials are dry. The cleanup phase should be completed before those repairs begin.
How Can You Prevent Mold After Water Damage?
The most effective mold prevention step is fast moisture removal. Wet materials should be dried within 24 to 48 hours when possible. A clean wall that stays damp can still support mold growth. Controlling indoor humidity after the initial cleanup also reduces the chance that moisture will remain trapped.
Use these precautions:
- Fix the original leak completely.
- Remove standing water quickly.
- Dry carpet padding and subfloors.
- Keep indoor humidity below 60 percent.
- Open cabinets to improve airflow.
- Replace materials that cannot be dried.
- Check hidden spaces with a moisture meter.
- Inspect the area for several days after cleanup.
- Address returning stains immediately.
- Investigate musty odors rather than covering them.
Avoid painting over a damp wall. New paint can hide discoloration without solving the moisture problem.
Mold and water damage repair can become much more involved once growth spreads into porous materials. Early drying reduces that risk.
How Can You Reduce Future Water Damage?
Preventing another loss starts with inspecting the parts of the home that commonly leak. Plumbing hoses and water heaters deserve routine attention. Drainage around the home should also move rainwater away from the foundation. Small moisture changes are easier to manage before they spread into finished materials.
Build these checks into normal home maintenance:
- Inspect plumbing connections every month.
- Check appliance hoses several times each year.
- Look around the water heater for moisture.
- Clean gutters when debris restricts drainage.
- Direct downspouts away from the foundation.
- Test the sump pump before heavy rain.
- Inspect ceilings after major storms.
- Watch previously repaired areas for returning stains.
- Check basement walls after prolonged rainfall.
- Investigate unexplained increases in indoor humidity.
Basement water cleanup often becomes more expensive when water repeatedly enters through the same drainage problem. Correcting the cause is more effective than repeatedly drying the same area.
The same principle applies throughout the home. A successful cleanup ends with a dry building and a corrected water source.
Conclusion
Water damage clean up works best when you stop the source first and remove standing water before beginning controlled drying. Check beneath visible surfaces because carpet or walls can stay wet after a room looks normal. Clean-water spills may be manageable at home while sewage or widespread damage needs greater caution. This week, inspect plumbing connections and moisture-prone areas for early signs of leakage.
Frequently Asked Questions
How quickly should water damage be cleaned up?
Cleanup should begin as soon as the area is safe. Wet materials should generally be dried within 24 to 48 hours to reduce the chance of mold growth.
Can I use a normal vacuum to remove water?
No. A standard household vacuum isn't designed to collect water and can create an electrical hazard. Use equipment specifically rated for wet extraction.
Does carpet have to be replaced after water damage?
Not always. Carpet exposed to clean water may sometimes be dried when action is fast. Contaminated carpet or badly saturated padding is more likely to need removal.
Can fans dry water inside walls?
Fans help surface evaporation but they don't confirm that a closed wall cavity is dry. Hidden moisture may require moisture readings or access to the affected cavity.
Should I use bleach on every water-damaged surface?
No. Cleaning methods depend on the surface and contamination involved. Never mix bleach with ammonia or other cleaning chemicals.
Can water damage return after cleanup?
The same damage does not return once the source and moisture are corrected. New staining or odor usually means moisture remained or another leak has developed.